Level Up Your Redux State Management: Mastering createEntityAdapter for Normalized Data

posted by Akash Sarki on 30 October 2025
Managing collections of data in your Redux store can quickly become complex. Think about lists of users, products, or tasks. If you're storing them as simple arrays, operations like finding an item, updating it, or deleting it can be inefficient and lead to convoluted reducer logic. This is where normalized state comes in, and Redux Toolkit's createEntityAdapter is your best friend for achieving it effortlessly.
In this post, we'll dive deep into createEntityAdapter, understand why it's a game-changer, and walk through real-world examples to show you how to streamline your Redux state management.
What is Normalized State and Why Do We Need It?
Before createEntityAdapter, let's briefly touch on normalized state. Imagine you have an array of Post objects:
// Unnormalized (Array of objects)
const posts = [
  { id: '1', title: 'First Post', content: '...', authorId: '101' },
  { id: '2', title: 'Second Post', content: '...', authorId: '102' },
  { id: '3', title: 'Third Post', content: '...', authorId: '101' },
];To find a post by ID, you'd iterate through the array. To update it, you'd map over the array. As your data grows, these operations become less performant.
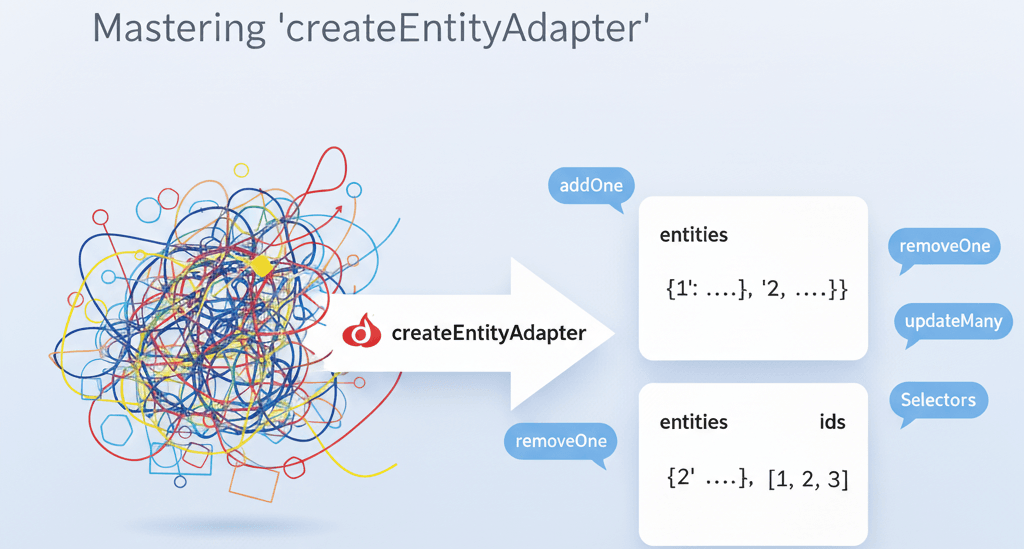
Normalized state, inspired by database normalization, stores your data in a flatter structure, typically with an object where keys are IDs and values are the entities themselves, alongside an array of those IDs:
// Normalized State
const posts = {
  ids: ['1', '2', '3'],
  entities: {
    '1': { id: '1', title: 'First Post', content: '...', authorId: '101' },
    '2': { id: '2', title: 'Second Post', content: '...', authorId: '102' },
    '3': { id: '3', title: 'Third Post', content: '...', authorId: '101' },
  },
};This structure offers several advantages:
Efficient Lookups: Access any entity directly by its ID (posts.entities['1']) in O(1) time.
Simplified Updates/Deletes: Operations become direct property assignments or deletions.
Consistency: Avoids data duplication, making your state more predictable.
The catch? Manually maintaining ids and entities can be tedious and error-prone. Enter createEntityAdapter!
Introducing createEntityAdapter
createEntityAdapter is a utility from Redux Toolkit that provides a standardized way to manage normalized data in your Redux store. It gives you:
- Pre-built Reducers: Functions to add, update, remove, and upsert entities.
- Powerful Selectors: Memoized selectors to efficiently retrieve entities, IDs, or the total count.
- Less Boilerplate: Significantly reduces the amount of code you need to write for common entity operations.
Let's see it in action!
Real-World Example 1: Managing a List of Products
Imagine an e-commerce application where you need to display, add, update, and remove products.
First, let's define our Product interface:
interface Product {
  id: string;
  name: string;
  price: number;
  inStock: boolean;
}Now, let's create our product slice using createEntityAdapter:
// productsSlice.js
import { createSlice, createEntityAdapter, createAsyncThunk } from '@reduxjs/toolkit';

// 1. Define the entity adapter
const productsAdapter = createEntityAdapter({
  selectId: (product) => product.id, // specify the ID field
  sortComparer: (a, b) => a.name.localeCompare(b.name), // optional: sort entities by name
});

// Initial state will be automatically created by the adapter
// { ids: [], entities: {} }
const initialState = productsAdapter.getInitialState();

// Async Thunk for fetching products (simulated API call)
export const fetchProducts = createAsyncThunk('products/fetchProducts', async () => {
  // Simulate API call
  const response = await new Promise(resolve =>
    setTimeout(() => {
      resolve([
        { id: 'p1', name: 'Laptop', price: 1200, inStock: true },
        { id: 'p2', name: 'Mouse', price: 25, inStock: true },
        { id: 'p3', name: 'Keyboard', price: 75, inStock: false },
      ]);
    }, 1000)
  );
  return response;
});

const productsSlice = createSlice({
  name: 'products',
  initialState,
  reducers: {
    // Adapter methods can be directly used as reducers
    addProduct: productsAdapter.addOne,
    removeProduct: productsAdapter.removeOne,
    updateProduct: productsAdapter.updateOne,
    upsertProduct: productsAdapter.upsertOne, // Add or update if exists
    setAllProducts: productsAdapter.setAll, // Replace all entities
  },
  extraReducers: (builder) => {
    builder.addCase(fetchProducts.fulfilled, (state, action) => {
      productsAdapter.setAll(state, action.payload); // Set fetched products
    });
  },
});

export const { addProduct, removeProduct, updateProduct, upsertProduct, setAllProducts } = productsSlice.actions;

// 2. Export selectors using the adapter
export const {
  selectAll: selectAllProducts,
  selectById: selectProductById,
  selectIds: selectProductIds,
  selectTotal: selectTotalProducts,
} = productsAdapter.getSelectors((state) => state.products); // Pass the slice's state

export default productsSlice.reducer;Explanation:
- createEntityAdapter: We initialize productsAdapter specifying selectId to tell the adapter which field acts as the unique identifier. We also added an optional sortComparer to keep our ids array sorted by product name.
- initialState: getInitialState() provides the perfect starting point { ids: [], entities: {} }.
- Reducers: Notice how we directly assign adapter methods like addOne, removeOne, updateOne, etc., to our reducers. These methods take care of all the ids and entities manipulation for you.
- Async Thunk Integration: In extraReducers, we use productsAdapter.setAll to efficiently load the products fetched from our simulated API call.
- Selectors: productsAdapter.getSelectors() is incredibly powerful. It generates memoized selectors that can retrieve all entities as an array, an entity by ID, just the IDs, or the total count, all with minimal effort on your part. You just need to pass it a function that gets the correct slice of your state.
Using it in your component:
import React, { useEffect } from 'react';
import { useSelector, useDispatch } from 'react-redux';
import {
  fetchProducts,
  addProduct,
  removeProduct,
  updateProduct,
  selectAllProducts,
  selectProductById,
  selectTotalProducts,
} from './productsSlice'; // Assuming productsSlice.js is in the same directory

const ProductList = () => {
  const dispatch = useDispatch();
  const products = useSelector(selectAllProducts); // Get all products as an array
  const totalProducts = useSelector(selectTotalProducts);
  const laptop = useSelector((state) => selectProductById(state, 'p1'));

  useEffect(() => {
    dispatch(fetchProducts());
  }, [dispatch]);

  const handleAddProduct = () => {
    dispatch(addProduct({ id: `p${totalProducts + 1}`, name: 'New Gadget', price: 50, inStock: true }));
  };

  const handleUpdateLaptop = () => {
    if (laptop) {
      dispatch(updateProduct({ id: 'p1', changes: { price: 1150, inStock: false } }));
    }
  };

  const handleRemoveMouse = () => {
    dispatch(removeProduct('p2'));
  };

  return (
    <div>
      <h1>Products ({totalProducts})</h1>
      <button onClick={handleAddProduct}>Add New Product</button>
      <button onClick={handleUpdateLaptop}>Update Laptop Price/Stock</button>
      <button onClick={handleRemoveMouse}>Remove Mouse</button>

      {products.length === 0 ? (
        <p>Loading products...</p>
      ) : (
        <ul>
          {products.map((product) => (
            <li key={product.id}>
              {product.name} - ${product.price} ({product.inStock ? 'In Stock' : 'Out of Stock'})
            </li>
          ))}
        </ul>
      )}

      <h2>Laptop Details:</h2>
      {laptop ? (
        <p>
          {laptop.name} - ${laptop.price} ({laptop.inStock ? 'In Stock' : 'Out of Stock'})
        </p>
      ) : (
        <p>Laptop not found or loading...</p>
      )}
    </div>
  );
};

export default ProductList;Real-World Example 2: Managing Tasks with Multi-Select and Bulk Actions
Consider a task management application where users can select multiple tasks and perform actions like marking them as complete or deleting them.
// tasksSlice.js
import { createSlice, createEntityAdapter } from '@reduxjs/toolkit';

interface Task {
  id: string;
  title: string;
  completed: boolean;
}

const tasksAdapter = createEntityAdapter<Task>({
  selectId: (task) => task.id,
  sortComparer: (a, b) => a.title.localeCompare(b.title),
});

const initialState = tasksAdapter.getInitialState({
  selectedTaskIds: [] as string[], // Custom state for selected tasks
  status: 'idle',
});

const tasksSlice = createSlice({
  name: 'tasks',
  initialState,
  reducers: {
    addTask: tasksAdapter.addOne,
    removeTask: tasksAdapter.removeOne,
    updateTask: tasksAdapter.updateOne,
    // Bulk actions using adapter methods
    addTasks: tasksAdapter.addMany,
    removeTasks: tasksAdapter.removeMany,
    updateTasks: tasksAdapter.updateMany,

    // Custom reducers for selection
    toggleTaskSelection: (state, action) => {
      const taskId = action.payload;
      if (state.selectedTaskIds.includes(taskId)) {
        state.selectedTaskIds = state.selectedTaskIds.filter((id) => id !== taskId);
      } else {
        state.selectedTaskIds.push(taskId);
      }
    },
    clearSelectedTasks: (state) => {
      state.selectedTaskIds = [];
    },
    markSelectedTasksComplete: (state) => {
      const updates = state.selectedTaskIds.map((id) => ({ id, changes: { completed: true } }));
      tasksAdapter.updateMany(state, updates);
      state.selectedTaskIds = []; // Clear selection after action
    },
    deleteSelectedTasks: (state) => {
      tasksAdapter.removeMany(state, state.selectedTaskIds);
      state.selectedTaskIds = []; // Clear selection after action
    },
    setTasks: tasksAdapter.setAll, // For initial loading
  },
});

export const {
  addTask,
  removeTask,
  updateTask,
  addTasks,
  removeTasks,
  updateTasks,
  toggleTaskSelection,
  clearSelectedTasks,
  markSelectedTasksComplete,
  deleteSelectedTasks,
  setTasks,
} = tasksSlice.actions;

export const {
  selectAll: selectAllTasks,
  selectById: selectTaskById,
  selectIds: selectTaskIds,
} = tasksAdapter.getSelectors((state) => state.tasks);

export const selectSelectedTaskIds = (state) => state.tasks.selectedTaskIds;
export const selectSelectedTasks = createSelector(
  [selectAllTasks, selectSelectedTaskIds],
  (allTasks, selectedIds) => allTasks.filter(task => selectedIds.includes(task.id))
);

export default tasksSlice.reducer;Key Takeaways from the Task Example:
- Custom State: You can easily combine createEntityAdapter's initial state with your own custom state properties (e.g., selectedTaskIds, status).
- Bulk Operations: addMany, removeMany, and updateMany are incredibly powerful for handling multiple entities at once, perfect for multi-select scenarios.
- Custom Reducers: You can still write your own reducers for logic not directly covered by the adapter (like toggleTaskSelection).
- Combined Selectors: Using createSelector from reselect (which Redux Toolkit re-exports), you can build sophisticated selectors that combine the adapter's selectors with your custom state, like selectSelectedTasks.
When to Use createEntityAdapter?
- You're managing a collection of items (users, posts, products, tasks, comments, etc.).
- These items have a unique ID.
- You frequently perform CRUD operations (create, read, update, delete) on individual items or groups of items.
- You need efficient lookups by ID.
- You want to reduce boilerplate and write cleaner reducer logic.
When Not to Use createEntityAdapter?
- For single, non-collection entities (e.g., a logged-in user's profile which is never an array).
- For data where IDs are not unique or where the concept of "entity" doesn't quite fit.
- For very small, static lists where the overhead might not be worth it (though it's often still beneficial for consistency).
Conclusion:
createEntityAdapter is a cornerstone utility within Redux Toolkit that empowers developers to manage normalized data with unparalleled ease and efficiency. By providing standardized reducers and highly optimized selectors, it significantly reduces boilerplate and potential for bugs in your Redux state. If you're working with collections of data in your Redux applications, integrating createEntityAdapter is a clear path to cleaner, more performant, and maintainable code.
Start leveraging it today and experience the difference!